The Top Mitsubishi Galant VR-4 Resource

Join the best E39A 1991-1992 Mitsubishi Galant VR-4 community and document your GVR4 journey. Login to browse without most ads.

SOHC Auto to DOHC manual conversion

fuel

Well-known member
Joined
Feb 23, 2009
Messages
2,166
Location
Toronto, ON, Canada
your engine looks to be a pre-facelift GTi-16V engine which would still be the same 145hp 9:1 CR as the pre-facelift JDM engine. If you've got a whole wiring loom from an '89 MX I would just use that which should plug into most of the existing sensors such as coolant temp sensors (for both gauge cluster and ECU), knock sensor, injectors, throttlebody etc.
 

Thanks for that Phil,

I had thought that maybe it had come from an SEI since I haven't been able to find a harness to suit, it would have been good to get the 10.1:1 though /ubbthreads/images/graemlins/smile.gif

Before this conversion I didn't know almost anything about sensors/computers etc as I had come from things like Minis, escorts and Cortinas. Now thanks to a LOT of reading and the members on this board I feel quite confident to figure things out and I've even been wiring in some new enngines at tech. What has got me stuck a bit though is weather I can run with some things not connected though, I'm talking mainly about the 02 sensor/fuel mixture adjuster /ubbthreads/images/graemlins/dunno.gif If I can then I reckon I've susted out how to wire in the other sensors as all the right colour wires seem to be there.

Justin
 

Well, I took the SOHC motor out today wasn't easy but that is because I didn't know to take the crank pulley off. That would have made it heaps easier /ubbthreads/images/graemlins/banghead.gif Those automatics are big heavy suckers. Thankfuly it came out without damaging anything.


The old motor and trans.

New motor waiting to go in

Hope I only have to take out the console to cut the shifter cable hole and not the whold dash, that would suck /ubbthreads/images/graemlins/frown.gif

Hopefully tomorrow I will get the Dohc in, but first I have to cut and polish the engine bay as well as clean everything, then install the DOHC wiring harness.

I'm going to polish the motor and spray the rocker cover metalcast red with polished letters in clear, I also have a chrome plug cover.
 

A small problem but I think I know what it is, going to call a galant guru tonight and ask him. The manual trans mount bracket is lower than the mount that bolts to the chassis (the old one that the auto bolted to) /ubbthreads/images/graemlins/frown.gif I had assumed that it would be the same since it's bolted to the car. but now I'm reckoning that the manual mount is lower. Also my sister came along and asked if I was going to paint the cam wheel cover and I ended up taking it off to show her, right there infront of me was a nasty split about a 1/4" long. The belt was suposed to be new so not sure how it happened. Does anyone know any good step by step tutorials for changing the timing belt? I've only ever rebuilt a push rod motor /ubbthreads/images/graemlins/uhh.gif


Solved the engine mount problem, $35 from the wrecker /ubbthreads/images/graemlins/grin.gif

Installed all new boots since it was apart any ways, don't know why since I'm just goingto replace them with vr ones /ubbthreads/images/graemlins/banghead.gif


Harness being installed, I'm trying to tuck it down out of sight as I think it looks messy tangling along the firewall.


The new engine mount since the auto one didn't lign up /ubbthreads/images/graemlins/frown.gif


My timing belt tensioning tool /ubbthreads/images/graemlins/smirk.gif

All going well I finaly get to start it up tomorrow /ubbthreads/images/graemlins/grin.gif
Any advice with the cambelt install?
 
Last edited by a moderator:

fuel

Well-known member
Joined
Feb 23, 2009
Messages
2,166
Location
Toronto, ON, Canada
I've never had to use one of those timing belt tensioning tools, however every time I do the belt install I fit a new auto tensioner or the old tensioner pin hole still lines up and I can still lock it in place with a pin. I generally wrap the belt around the top cam wheels and use bulldog clips to keep the belt in place on the pulleys, as one of the pulleys can try move on its own. Then I go around the idler bearing, crankshaft and with the tensioner bearing removed I pull on the belt where the tensioner bearing would be to take the slack out, then fit the tensioner bearing under the belt and move it so you can fit the bolt onto the arm which connects it to the auto tensioner. I don't have the tool to set the right amount of Nm on the tensioner bearing either, I just use two 3mm allen keys in the holes with a spanner or screwdriver between the two and tightening it up to what I think feels right. Then I rotate the engine over a couple times and re-check the tension on the tensioner bearing and re-set it if necessary. Once I'm satisfied I pull the pin on the auto tensioner and turn it over a few times and then leave it for about 30 mins - every time I've done it the pin hole still lines up.
 

Thanks for the help, I've run into a small problem. The guy who I got the motor from was very kind and drained all the trans fluid /ubbthreads/images/graemlins/bawling.gif Can someone tell me how much I need? I read somewhere on a DSM site 2.4 quarts and my converter says that's like 2.5 litres but surely not /ubbthreads/images/graemlins/confused.gif
 

fuel

Well-known member
Joined
Feb 23, 2009
Messages
2,166
Location
Toronto, ON, Canada
about 2.3L of 80W90 GL-4 rated oil, such as Castrol VMX. DON'T use a GL-5 oil, it will damage the brass components inside.

Just fill it up from the fill plug until it oil flows out of the fill plug. It's about 1/3rd the way up of the gearbox closish to the chassis rail, opposite to the radiator. You will need a good bendy-funnel to do the job.
 

grocery_getter

Well-known member
Joined
Jun 20, 2004
Messages
1,225
Location
Kent - industrial suburbs of Seattle, WA
I like to fill up the tranny oil from the breather port. Tighten the drain plug, open the fill plug, fill from breather port. When oil start flowing out from the fill hole then you are done. Don't forget to re-install the breather again on the port. As the tranny breather port is really small, much smaller then the regular funnels out there, I keep a used container of gear oil with the point tip and cut it to fit the hole diameter. Instant funnel.
 

Thanks for the help guys! Quote:
about 2.3L of 80W90 GL-4 rated oil, such as Castrol VMX. DON'T use a GL-5 oil, it will damage the brass components inside.


Very helpful advice fuel, I could have gone out and bought something that would have damaged my trans /ubbthreads/images/graemlins/frown.gif if you hadn't of said that.

I have found three aparent fillers/drains. One (I think 17mm) bolt in the front of the trans, one (19mm) on the back of the diff housing. Is that the drain? and one (I think 19mm) on the top of the trans bretty much beside the starter I assume that is the breather grocery_getter was talking about.

I got the cambelt changed today, got the axles all together and connected the exaust. Don't think there is any reason why I couldn't try and start it tomorrow /ubbthreads/images/graemlins/grin.gif, then I could install my clutch and shifter cables /ubbthreads/images/graemlins/applause.gif
 

I wasn't going to update this but since some people on other forums have been asking about this conversion I thought I might since there will probably be ither people come along in the future wanting information, plus it just helps the forum too.

The car us currently running well, everything works including the Tacho and it seems acurate. the only thing that isn't working correctly and I'm gong to have to figure out is the window wipers, no matter what setting I put them on they go the same speed /ubbthreads/images/graemlins/banghead.gif

I'm building a JDM 4g63T to go in this, but I'm not sure I will change the motor, rather just add turbo to this motor and run standard boost, or maybe remove the head and change the pistons for turbo ones with the motor still in the car. Or maybe just keep the car as a good performing N/A Daily driver and add a dry nitrous sistem for those times I want a turbo /ubbthreads/images/graemlins/grin.gif I'm not sure yet. but this is only the begining for the car. That way when I get a vr4 I can restore it and keep it stock (yeah right /ubbthreads/images/graemlins/rofl.gif).
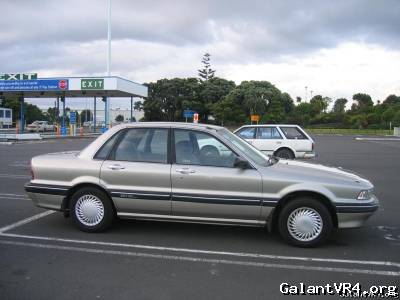

This is the car as I bought it
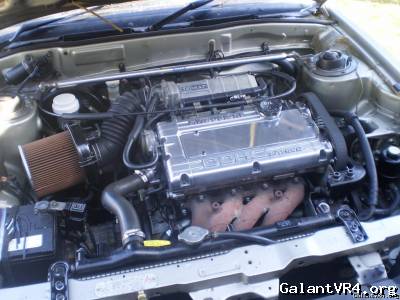
Here it is as of yesterday, still a few very small things I have yet to do.
 
Last edited by a moderator:


I just got a JDM rear bumper for it,I'm going to paint it with the black molding like the sides, with origional color lower portion.


I replaced a lot of engine bolts with these.

This is the hole for the clutch I had to make in the firewall, I then etched it and primed it. Yes the body number is EB6 NZDM
 

If anyone is wondering why all the small posts and not one big one it's because my internet explorer keeps losing the page.

This is from the inside where I had to make both clutch and shifter holes.


I have/am polishing almost everything aluminum in the engine bay, alternator, master cylinders, wiper motor etc.
Here is the clutch master after polishing

Here it is installed


Here's the interior right now, not yet fully assembled, and a bit grubby as you would expect from 3 weeks work and no vacuming. I have a standard shift knob but I like the weight of this one as it's quite heavy.

That manifold is temorary and is being replaced with polished stainless Japanese headers, also for when I go turbo I have polished stainless tubular turbo headers /ubbthreads/images/graemlins/grin.gif

 
Last edited by a moderator:

Next I want to create a better intake, the factory air filter is restrictive because the air is drawn in from the sides. Here is my design, and is basicaly an elaborate pod adapter. It will be plastic welded together from a piece of 4" DIA with a back on it that the AFM bolts to and sits inside, with a rectangle hole in the top for the protrusion from round of the stock afm (if that makes sense) it would be fully sealed around said hole with black silicon. the 4" section would need to be about 4" long, using a 4" to 3" silicon adapter a standard 3" pod filter could be used and the air flow would be straight into the afm. I'm thinking of using hardware store white pvc pieces to cut up and plastic weld, dress them with a wet rub and paint black. The pod could fit quite snugly behind the battery. Hope that's understandable.

Here is a picture

I think it would look factory
 
Support Vendors who Support the GVR-4 Community
Boosted Fabrication ECM Tuning ExtremePSI Fuel Injector Clinic Jacks Transmissions JNZ Tuning Kiggly Racing Morrison Fabrications RixRacing RockAuto RTM Racing STM Tuned

Recent Forum Posts

Top