The Top Mitsubishi Galant VR-4 Resource

Join the best E39A 1991-1992 Mitsubishi Galant VR-4 community and document your GVR4 journey. Login to browse without most ads.

New Owner of #1899/2000

minneSNOWta

Well-known member
Joined
May 14, 2011
Messages
363
Location
Eagan, MN
I went through ECO Finishing and had to pay an $80 minimum. They could have done a better job on some of my parts though as far as rack marks go. I suggest having the oil caps anodized first and then have the letters and numbers machined after to really pop. Unfortunately, only one color per batch. You can also try MN Metal Finishing.
 

CutlassJim

Well-known member
Joined
Jul 17, 2006
Messages
1,699
Location
Manchester, NH
Quoting prove_it:
I think about a year ago I purchased the last dealer stock front backing plates. Not sure. Where the hell did you get an oem PS belt? My mitsu guy said they are NLA.


I just got new OEM backing plates from JNZ a few months ago.
 

minneSNOWta

Well-known member
Joined
May 14, 2011
Messages
363
Location
Eagan, MN
^Thanks. Enjoy that VR-4 of yours!


Got a couple surprises in the mail today.

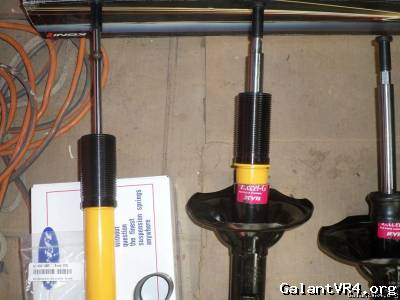
Swift metric coilover springs. They are 2.5"(65mm). Fronts are 7" 8K and the rears are 9" 6K. I'm pretty much trying to replicate the Ground Control setup with my own combo of stuff. I like that these are made in Japan, light, have a lifetime warranty, and also linear. Waiting for new GR-2/Excel-G struts, threaded sleeves, lower spring seats, and spring adapters to arrive. "Without question the finest suspension springs anywhere" - Swift.


Thanks to Craig for selling me this 8G VR-4 badge. I accidentally broke my other one in half while it was in my pocket.
 
Last edited:

minneSNOWta

Well-known member
Joined
May 14, 2011
Messages
363
Location
Eagan, MN
Nothing too exciting. Waiting on Koni sleeve parts and orchids to come in the mail. Also got to hang out with a former Archer Racing mechanic today and talk about cars. Dude has a pretty sweet 4G63 Colt GT with S16G. He ended up buying that blue Dejon setup I had for sale. Should have got a picture of it, but I may run into him again this summer.


New KYB Excel-G struts(#334030). I want to be able to drop the new suspension in and not have to reuse the dirty old struts for housings. Will try and take these up the hill to Archer Racing this week to have them gutted to install the 1G Koni front inserts. Race season may get in the way, but I have another month before I can get my car towed down to a shop. Maybe I will get some pictures of the shop and cars if they don't mind.
 
Last edited:

minneSNOWta

Well-known member
Joined
May 14, 2011
Messages
363
Location
Eagan, MN
Got my struts back from Archer. Unfortunately, I forgot to take pics of the shop, but I may be going back soon to have new snap ring grooves cut on the rear Koni's. I'm an idiot and realized that I need 50mm threaded inserts for the front, since they need to slip over the KYB 50mm diameter strut tube. Plus I need to pull the Koni inserts out, so that the lip of the strut insert holds the threaded insert down. /ubbthreads/images/graemlins/banghead.gif. New strut housings though, so might not be too difficult. Will need to exchange my pair of 42mm's for 50mm's and order 2 25mm top hats for the rear(forgot to order), 4 new bump stops, 2 pairs of Torrington bearing housings, and 1 pair of Torrington bearings. The Torrington setup will be for the rear springs because I will be using stock strut mounts, which won't help with deflection. Think I also might need another pair of spring adapters for the 25mm top hats too.
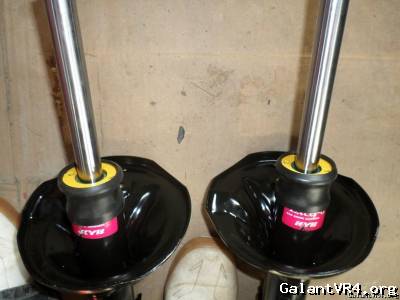


The threaded insert on the rear strut on the left is sitting too high, which is why I need a new snap ring groove cut further down. There are two grooves on the shock higher up, but none lower portion. I will be using the top snap ring and relocating the bottom snap ring to the new groove to sandwich the insert. On the right you can see why a 42mm insert won't work on the fronts. It will fit on the Koni tube, but not inside the strut housing. Will get pics when I do them over right.


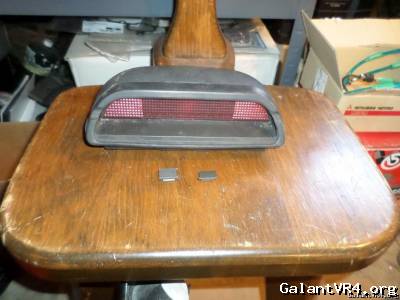
Broseph went to the junk yard for me and nabbed up a few items for me. If I decide to go with a lip spoiler for the trunk later on, I want to make sure I retain a third brake light for safety purposes. Was reading that I may need the "cardboard" top part that has a cutout for it, but I may cut into the stock one if I need to go there. Think some wires need to be extended to reach as well.


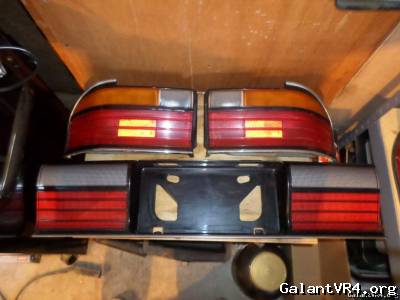
Kevin also got me '89 tails and the chrome strip that goes across(not pictured). I needed the chrome strip for my 92's, so the tail swap would be complete. Doesn't look quite right, when the black strip is left on.


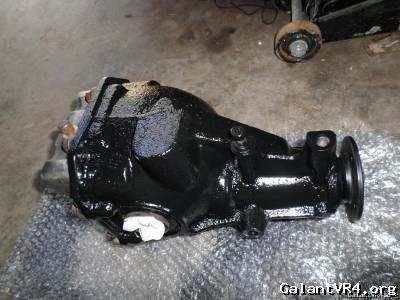
Got bored and decided to start painting the diff housing. Cleaned it up with Brakleen, Simple Green, primed with Rustoleum Rust Reformer, and then put a few coats of Rustoleum gloss black on. Need to source cups, diff cover hardware, diff fill/drain plugs, axle seals, and a front seal. Still need to hit up the parts store for rear axles with a lifetime warranty.
 

EMX5636

Well-known member
Joined
Jun 28, 2008
Messages
1,631
Location
Bucks County, PA
Looks awesome man! I'm jealous of the wheels. I've been window shopping for a style I like, but need a new set of coilovers first.

Sucks about the cam pin, I wonder if one of the journals in that head was messed up. Probably good you got an entire new one.
 

minneSNOWta

Well-known member
Joined
May 14, 2011
Messages
363
Location
Eagan, MN
Thanks everybody. Trying to keep the momentum going.

Got my 2G rear struts back from Archer. They machined new snap ring grooves further down the strut body for me. Now I have quite a bit of room for adjustment and the 42mm sleeve is properly located on the body.
 

minneSNOWta

Well-known member
Joined
May 14, 2011
Messages
363
Location
Eagan, MN
Been working on a little project. Got a Momo blank horn button for my Monte Carlo wheel. Tried to have it laser engraved, but they cracked the first and second horn button I sent out. Then, I tried to get this third button rotary engraved and color-filled, but the button has a spring that wouldn't allow them to properly engrave. Got in touch with a local decal shop and they made me a mini VR-4 decal in gold. The horn button that came with the wheel is cool, but I think this is a nice touch to go with my mats and dash badge.
 

ApexHunter

Well-known member
Joined
Apr 25, 2007
Messages
1,996
Location
Marysville, WA
No kidding. You're doing a lot of cool stuff and it looks really fun. Reminds me of how to have fun with it actually.

Saw the post about your sweet turbo timer and local shop with HKS stuff. The deal with HKS is they still have US distribution exclusively through Motovicity. Any retailer hooked up with MV has access.

I almost bought those Konis from blacksheep. I bought BCs instead. Meh. Admittedly i pussed out and just wasn't willing to go the distance there, so big big props to you on making a wicked little homebrew coilover setup with quality shocks. I've had great experience with Konis over the years.

Didn't know you could txfr the bubble in the FP gauge into the back, makes sense though i guess. Hopefully you can post about that. Minor detail, but interesting.
 

ApexHunter

Well-known member
Joined
Apr 25, 2007
Messages
1,996
Location
Marysville, WA
PS the poly bushings in the radiator stays are bitchin. Where'd you source the bushings from? Almost looked like skateboard truck bushings to me at first glance. I think those are just a smidge too small though maybe.
 

transparentdsm

Well-known member
Joined
Jul 27, 2011
Messages
3,690
Location
Cherry Hill, NJ
i did the same thing to mine. i used sway bar end link bushings from a truck.

like these
img.php
 

iceman69510

Turn Right Racing
Staff member
Joined
Mar 5, 2001
Messages
10,991
Location
Michigan
Quoting minneSNOWta:
iceman - Awesome! Do you have a part number for the right side knuckle? What about the dust shield? I was told by JNZ that dust shields are NLA. What do you want for those?


Andre, sorry I did not realize how long I had dropped the ball on this.

The knuckle I have I believe is part number MB518137. The dust shield I am not sure about, since I am a bit confused on the parts I have. It was an assembly for a FWD vehicle (D22 Eclipse) and should have been a 90 model by the ink date on it (1989), but the shield says "15" , which would be the brake size for an AWD drive vehicle (memory is fuzzy, maybe some FWD had the 15" brake size too). Anyway, 15" should fit a GVR4 rotor, but appearance is slightly different than the stock GVR4 pieces.

Not too attached to them. PM me an offer. Shipping will be a bit for the weight of the knuckle.
 

minneSNOWta

Well-known member
Joined
May 14, 2011
Messages
363
Location
Eagan, MN
^I wish you had the other side. JNZ told me NLA in the U.S., but I asked them to check globally. Will let you know if I need that. Same with the backing plate. I need to see if I can find another one. I really appreciate the offer.


Progress has been a little slow. I got the 50mm ID sleeves for the front, but they would not fit over the strut tube. Got linked up to a sweet little machine shop that bored out the sleeves for me. It was literally 2-3mm too big and I did not want to distort the threaded collar from pounding it down over the strut tube. The inside lip that is used for snap rings, will not be needed for the front, since the collars rest on the stock perch. The sleeve was also a little too tall and would not allow the insert to slide down all the way. Took the sleeves back over to Bob at the shop and he cut 15/16" off to make them the same height as the rear collars. Also, put a chamfer on, so that the perches can still slide over the threads. Didn't even charge me for the second job. Stand up dude for sure.


Here's a preview of the fronts. All I need are top hats and camber plates. The following are all Koni parts: 50mm sleeve, 2.5" lower perch, packer, and 45mm progressive soft bump stop(22-24mm rod). I thought I needed spring adapters for the fronts, but the perch is already 2.5" unlike the rear perches. May decide to remove the Torrington bearings from the rear since the spring is able to rotate on the nylon spring adapter against the metal. I will probably use them under the front springs since they are more likely to bind with turning and such. Plus when stacked on the rear spring adapter, it makes the perch not as tall, which may make the rear springs unseat.


Preview of the rears. All I need to do is install washers in the correct place and get strut mounts. The following are all Koni(minus bearings): 42mm sleeve, 2.25" lower perch, 2.25"-2.5" nylon spring adapter, 2.5" Torrington bearing assembly(TRA-4052 x2 & NTA-4052 x1), packer, 55mm progressive soft bump stop(12mm rod), 2.25"-2.5" spring adapter, and 25mm upper perch.


Just waiting on some calipers and a few other things. Pretty proud of myself that I was able to assemble a decent homebrew setup piece-by-piece. I hope I can get the G going this season.
 

iceman69510

Turn Right Racing
Staff member
Joined
Mar 5, 2001
Messages
10,991
Location
Michigan
If I had had the other side, I would have used it. I ended up with 2 new knuckles of the same side, so I had to get the other side from Toybreaker.
 

tektic

Well-known member
Joined
Dec 19, 2012
Messages
1,497
Location
ronkonkoma, ny
Hope you like them more than I like my ground controls. The addition of the torrington bearing up front should help alot.
Pleas link your bearing housing and bearing as I might try to upgrade mine. If you did an I missed it I'm sorry.
 

minneSNOWta

Well-known member
Joined
May 14, 2011
Messages
363
Location
Eagan, MN
iceman69510 - I found the other side, but it will be 90 days from JP with no backing out. I'm just not sure if I want the FWD knuckles anymore. Maybe after this summer, I will see how the suspension feels before I make the move.

tektic - I provided the part numbers in my post above.


Did some digging around for photos and found this one of my car at Archer Racing from a couple years ago I think. I think I mentioned this earlier, but they had to move a Viper and park it outside to fit my car in the garage.


Couldn't decide what to do in order to finish the rear suspension setup. It was either get new OEM rear upper strut mounts, 2G rear upper strut mounts, or else a pillow-ball setup. Picked these rear Tein pillowballs up from Japan. The pillow collars are 10mm ID, so I will have to drill out them to accommodate the 12mm Koni shafts. The "washer" collar seems like it rests directly on the pillow-ball, which would put a lot of stress on it and wear it out prematurely. I think I will try to find the proper 18mm OD x 12mm ID sleeve bearings that will fit on the inside of the pillow-ball and to allow for proper deflection. Also need to make sure the sleeve bearings I get are the right height, so that the upper perches aren't resting on the lip of the plates.


Part number for reference.


Forgot to post this earlier, so I'll just add it in. After some difficulty getting off the center section, I finally got the tails changed over. The plastic covered bolts just kept spinning and weren't going to come off unless I cut them off, which I did with a dremel. The chrome strip for the blank '92 tails has some broken bolts, so I may have to use double-sided tape to hold it on until I can find another one. In case you guys were wondering about the plate, it's a collector's plate. As long as it's 20 years old and you have another car registered, then no tabs for life. The law says no "general transportation", which is very loosely defined. I wanted 1899, but MN requires one letter.


Turbo should be finished soon. Waiting on front camber plates to come in as well as upper spring perches for the front. I will have TrueChoice drill out the upper spring perches for me, so that they can fit on the Koni "square" shoulder on the front struts. Hope I can get the setup finished soon.
 
Last edited:
Support Vendors who Support the GVR-4 Community
Boosted Fabrication ECM Tuning ExtremePSI Fuel Injector Clinic Jacks Transmissions JNZ Tuning Kiggly Racing Morrison Fabrications RixRacing RockAuto RTM Racing STM Tuned

Recent Forum Posts

Recent Classifieds Listings

Top