The Top Mitsubishi Galant VR-4 Resource

Join the best E39A 1991-1992 Mitsubishi Galant VR-4 community and document your GVR4 journey. Login to browse without most ads.

1101 rebuild thread. 4/8/13 FMIC up by A/C condenser.

boostedinaz

Well-known member
Joined
Apr 20, 2006
Messages
4,085
Location
Scottsdale, AZ
Did a little more work on 1101 today. I've know about some boost leaks on the car and recently noticed it had been running poorly. I put 2 and 2 together and decided to track down the leaks. In a weird way I was hoping all the stock intercooler piping was bad so I could put on my EVO intercooler. After today I realized my piping was fine, I did however find why the car was running poorly.

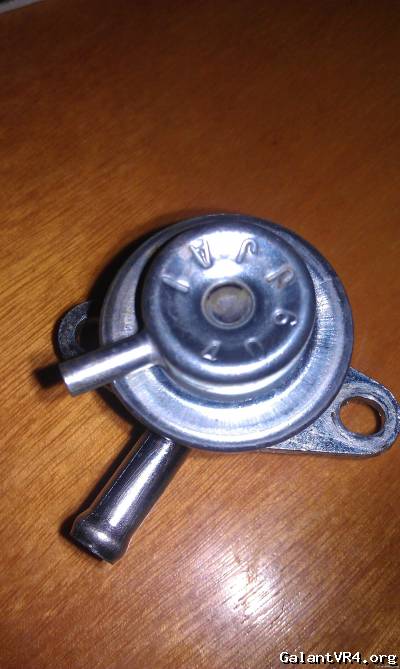
If you look right below the letter A on the FPR you can see a black line. That is actually a crack in the housing and a HUGE vacuum leak. I have a feeling my fuel pressure was all over the place and not sufficient during boost. Swapped it out with a known working piece and bam car runs much better. Other than that I need to pick up some injector seals and I should be good to go from there.
 

boostedinaz

Well-known member
Joined
Apr 20, 2006
Messages
4,085
Location
Scottsdale, AZ
Yeah the stock one I got says Denso on it. The stock one also feels heavier and more well made. I might try and look up what that shiny POS is later tonight.
 

PreskitVR4

Well-known member
Joined
Jun 28, 2008
Messages
272
Location
Prescott, Northern AZ
Quoting boostedinaz:
Finally got something I have always wanted for 1101....EVO wheels. I think they look really good and have the perfect specs for our cars. I picked these up from Dale (PreskitVR4) for a great price and couldn't be any more happy. They have changed the over look and feel of the car. I gotta put a little more camber in the front to tuck them but they are already a HUGE improvement from my old wheels.


Eww! Whose black POS is that in the background dirtying up what was a nice pic of your car!? Glad you like them Mike.
 

ktmrider

Well-known member
Joined
Sep 10, 2007
Messages
3,128
Location
Tempe, AZ
Liking the EVO wheel look Mike!

BTW I'm driving out to PHX the week of 9/24 thru 9/28, anyone around or open for a GTG? I may drive 464 altho the OBXT is running pretty sweet.
 

ktmrider

Well-known member
Joined
Sep 10, 2007
Messages
3,128
Location
Tempe, AZ
^^ And we did just that tonite!

Great to see you as always, maybe next month we'll get the whole AZ-CRU up and running LOL.
 

boostedinaz

Well-known member
Joined
Apr 20, 2006
Messages
4,085
Location
Scottsdale, AZ
Thanks. I must admit it's a bit of a 10 footer.

One of these days I'll pull it all apart and make a truly nice car. Every time I see #3 it makes me want to start that project immediately.
 

boostedinaz

Well-known member
Joined
Apr 20, 2006
Messages
4,085
Location
Scottsdale, AZ
Quoting ktmrider:
^^ And we did just that tonite!

Great to see you as always, maybe next month we'll get the whole AZ-CRU up and running LOL.


Yeah I gotta get the word out sooner next time and see if we can actually get a few more people together.

I had a great time even if it was short.
 

boostedinaz

Well-known member
Joined
Apr 20, 2006
Messages
4,085
Location
Scottsdale, AZ
A little more progress in the last few days. Noticed a small fluid leak one day and after poking around I found that the brake master was leaking. I decided that now was the time to finally finish the brake project I had been working on. I pulled out my ABS delete kit, braided brake lines, and new master so i could install them. Did it at work in case I ran into any unforseen issues.

Back in in natural state....JSB style.


Took the wheels off and vacuumed down the brake system from each caliper.


Taking out the ABS was a bit more of a pain that I thought it would be. for some reason I wanted to save all the lines but after a bit I said screw it and ended up just cutting a few. Once the lines were out I could get rid of the "lawn mower" and the proportioning valve.


I had to "bench" bleed the new master before putting in the new lines. Decided to make my own bleeder out of some of the old brakes lines so I can bleed it on the car.


At this point I just had to install all the new lines, proportioning valve, and bleed the system.


After driving it I can say that these mods made a HUGE difference in pedal feel. It feel much more firm and the brakes seem more predictable. It's also nice knowing that the car has all knew brake everything in the last 4 months. One of these days when I can have the car down for a day or so I'll paint the caliper black and maybe even get crazy and paint the rotors as well.

Only down side was the car was filthy so I decided to wash it and clean her up a bit.


turbowop

Well-known member
Joined
Apr 29, 2001
Messages
11,976
Location
Yakima, WA
Xmas icicle lights seem so out of place for me on a home in AZ. /ubbthreads/images/graemlins/rofl.gif

Excellent work on the car. /ubbthreads/images/graemlins/smile.gif
 

boostedinaz

Well-known member
Joined
Apr 20, 2006
Messages
4,085
Location
Scottsdale, AZ
Ehhh it's a bit of a 10 footer. The paint is fading on the roof, hood, and trunk lid and it has door dings all over it. While it has seen better days it's still a really nice chassis.
 

boostedinaz

Well-known member
Joined
Apr 20, 2006
Messages
4,085
Location
Scottsdale, AZ
Here is another little project I did at work. I need to replace the stock intercooler pipping and decided that if I'm gonna do that I might as well add a FMIC. As usual a small project spirals out of control into a large project. I didn't want to run a large amount of pipe through the car and in order to do a nice short route setup I needed to move the intake which also requires moving the battery.

Since I have removed all the emission equipment I had a decent amount of room where the charcoal canister use to reside. Now since 1101 will ALWAYS be a street car I also wanted to retain a stock size battery and this would pose a bit of a challenge. After a bit of measuring it looked like it could be done. Here is how I did it.

First I had to make the tray. Since I am using a heavy full size battery I wanted to mount to be strong so I used 1/8" cold rolled sheet to make it. I decided on a design and started cutting and shaping.


The first problem I ran into was the tranny. The edge of the battery would hit the tranny while sitting flush on the subframe. I couldn't go anywhere but up so I made 1-1/4" spacers under the tray that would rest on the subframe.


With the space constraints figured out I had to figure out how to mount it to the chassis. I found two thread holes in the chassis that were close and made brackets to attach to those points.


Now I have to secure the battery to the tray itself.


Here is the finished product.


In the car.


This was a nice project and while it turned out pretty well there are a few things I would do different next time. Either way I am able to say I made a tray from only raw materials and relocated a full size battery.

Special thanks to Kent and Jim at PCW for their amazing welding skills.

 
Last edited:

boostedinaz

Well-known member
Joined
Apr 20, 2006
Messages
4,085
Location
Scottsdale, AZ
As mentioned the whole point of this project was a FMIC setup to get rid of the stock and very leaky intercooler piping. I was gonna use an EVO core but I got a good deal on the old air to air setup off our shop car. After some basic measurements it looked like it would fit behind the grill right up against the A/C condenser. I was a bit iffy on cutting the car as I did but one of the main things I've learned at the shop is that there is always a solution you just gotta figure it out.

Here is some of how I figured it out.

I got a bit excited and started cutting the core before I could get a good pic but here it is after I realized that. The stock end tanks wouldn't work so I cut them off in order to make my own. The core is pretty big 4.5x12x18.


It dwarfs the stock piece.


I had to get rid of the stock hood latch and some of the grill/headlight mount and the cooling fan. After a lot of cutting I was able to get the core to fir where I want.


Now that the core is mounted I had to figure out how my end tanks were gonna work. There were some A/C lines in the way and since this is street car I was not getting rid of the A/C. A few templates and some .060 5052 aluminum sheet and I had end tanks made.


Double check fitment because what you make out of paper doesn't always translate to metal.


Here is Kent working his magic and bam end tanks.


They can't be welded to the core just yet as I had to clean up where I cut off the old end tanks. I also had to cut the holes for the piping and didn't want any more debris to get in the core. Here they are taped to the core for a final check on fitment and pipe placement.


Now all that is left is to make the piping for the hot and cold side, make an intake pipe, cut out a flange for the BOV, and make a recirc pipe. The hot side will be 2.5 aluminum and the hot side will be 2.75 to match the N/T throttle body I have. Hopefully I can get that done this coming weekend.


Again big thanks to Kent and Jim at PCW.
 
Support Vendors who Support the GVR-4 Community
Boosted Fabrication ECM Tuning ExtremePSI Fuel Injector Clinic Jacks Transmissions JNZ Tuning Kiggly Racing Morrison Fabrications RixRacing RockAuto RTM Racing STM Tuned

Recent Forum Posts

Recent Classifieds Listings

Top