The Top Mitsubishi Galant VR-4 Resource

Join the best E39A 1991-1992 Mitsubishi Galant VR-4 community and document your GVR4 journey. Login to browse without most ads.

Cookie Sheet Heat Shield (alternator)

JNR

Well-known member
Joined
Apr 23, 2004
Messages
9,820
Location
ca
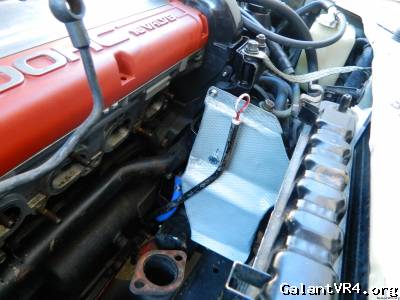
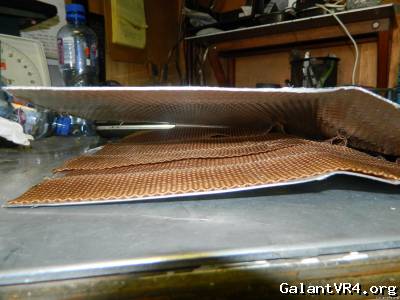
As I mentioned in another thread, here is the heat shield I've been working on. It started off as a cookie sheet I picked up for like $1 and trimmed it, opened it up and put silica wrap inside and formed/closed it back up as needed. The goal was to be able to put this in or take it out with everything attached and it should be able to do so from my earlier mock-up...I'm not done with it quite yet, but will end up painting it and possibly getting a nicer looking bolt for that M10 at the PS pump(why does mitsu have to use 1.25 on everything, as I have everything but, lol).

Anyway, here's the silica:


and the unit mounted.


may add some more after it's all done but I wanted to put something there in addition to the wrapped O2 housing, as I don't want to be doing any alternator changes after all this.
 

ducttapeguy

Well-known member
Joined
Jul 8, 2004
Messages
1,208
Location
Ft Hood/San Antonio, Tx
Nice. I like the layer of silica wrap in there. Should keep your alternator out of the heat. Makes me want to do the same thing for my manifold and O2 housing...


Are all the cookie sheets 2 later like that? Or did you go looking for a certain type or brand?
 
Last edited:

alansupra94

Well-known member
Joined
Mar 3, 2010
Messages
1,909
Location
Wayne,NJ
Very cool! I ended up going the opposite way and putting a heat shield I had lying around on there. Cut a hole for the O2 sensor and zip tied it to the oil dip stick. Doesn't look as ghetto as it sounds but would rather save the alternator than look nice.

When the VGT Holset drops in, I probably will come up with a much nicer option with the new downpipe I will have to make.
 

LIV4PSI

Well-known member
Joined
Nov 24, 2011
Messages
1,774
Location
O-H-I-O
Looks good. You would never guess it started life as a cookie sheet, since it looks like it belongs there.
 

James

Well-known member
Joined
Apr 7, 2012
Messages
1,322
Location
Port richey Florida
If you happen to make another could you do a more detailed write up? I'm sure I could figure out the cuts and what not but the more details the better. Looks great.
 

JNR

Well-known member
Joined
Apr 23, 2004
Messages
9,820
Location
ca
You're just getting old /ubbthreads/images/graemlins/grin.gif Yeah, it does appear those are machine marks, but had assumed that'd how the oem heads are? It's possible the PO had some head work, as he put a lot of $$$ into that engine. I did notice #4 (? closest to pass. side) exhaust seal is a little messed up, as some oil witness marks and need to replace those someday (have them, but just want this to get running). Otherwise, it looks new still.

Anyhow, thanks guys for the compliments and I think this ought to work out great. As for what it is, I ended up finding a flat cookie sheet that had a cool texture on the top side, which to me looked sort of what a heat shield would. I originally bought the sheet for my CTS-V as I was going to build an intake box/shield, but sold the car. So, had this sitting around, already bent up for that box and it had flats large enough to trim out this piece.

Well, most sheets have an air pocket in it and some are insulated, which I thought this one was, but it wasn't. I have a bunch of silica wrap leftover, so figured I may as well stuff some in bewteen.

One thing about that area is you cannot really use a flat piece, since the alternator wiring/harness plug would hit and I didn't want it touching there. I suppose you could if you used a spacer at the top, but I didn't want to do that, either.

The way I made it was just trial and error, as far as trimming (you have to clear the IC piping, the coolant hose at the bottom and transfer tube at the side, along with the wiring, as I mentioned. The aluminum is pretty thin and was already crimped on one end (where the factory put the two pieces together) and for the other end, I simply bent it back over itself and sort of hammered it closed. Real easy to work with, but what you can't see is part of it is bent at a 90 degree in the rear, so this thing is really stout.

It's obviously not finished, but another thing I need to point at is at the top where there wasn't enough meat to bend it back over (in retrospect, I'd have cut it longer there to be able to do that), I just put some jb weld there, mostly just to seal and not as a structural aspect...same thing on the rear (where the bent back "crimps" are), I just used it to flattend it out.

Wouldn't mind making another, although it is something that is pretty simple to make with common tools and some patience. The trickiest part (and not difficult, just trial and error) was making it so I could slide it from the top and it just come down easy without hitting anything. I wanted to make it in such a way that everything could be on there, yet I could still pull it out. I think on any future units though, it may be just as easy to start with some raw aluminum (or stainless) and do it like thta...However, for the price, you cannot beat a cookie sheet. Just don't get the kind with the sides on it though, since you'd not have a pre-crimped side, if that makes sense. IIRC, I picked this up at a garage sale or something and paid $1. I have an all-clad ($$ new) SS flat sheet sitting around somewhere too, but it's much thicker and not sure it even has an air pocket, but mentioned that as some sheets are stainless steel.

Also, wouldn't mind making one that looked even nicer, but this one doesn't look bad and I like the texture that makes it look sort of oem-ish...what I don't like is that ugly hex head bolt, but that's all I had on hand (it's M10-1.25, which is sort of an oddball) and I cut the bolt down on the lathe; there is a thru-hole there, so the 40 mm length would've worked, but why have extra and it'd be that much harder topull the screw out with the manifold and stuff on there. The top bolt is M8-1.25 and is pretty short (< 20 mm) and has a blind thread, so don't go too long.

sorry I didn't take any status pics, so to speak, but if you have any questions...
 
Last edited:

GSX_TC

Well-known member
Joined
Apr 7, 2011
Messages
3,729
Location
Houston, Texas
I am very interested in having you make one of these for me. And I like the stainless idea. How much would it cost to do altogether?
 

JNR

Well-known member
Joined
Apr 23, 2004
Messages
9,820
Location
ca
Let me see what I have left as far as this cookie sheet and/or how feasible stainless would be (considering what I have for cutting/bending at home) and see about how $$ it would be; reasonable cost whatever it'd be, just need to see what sort of time I have available /ubbthreads/images/graemlins/smile.gif [trying to get the Galant running and almost there, yay, and getting the truck ready for an excursion soon].
 

JNR

Well-known member
Joined
Apr 23, 2004
Messages
9,820
Location
ca
OK, guys...give me a couple days to see what I can come up with, as I have access to some better equipment at work *but* need to see how 'free' that'll be or not.

I wonder if a thick(er) piece of stainless would be as effective as a double-ply aluminum with silica inside?
 

IncorpoRatedX

Well-known member
Joined
May 28, 2003
Messages
5,593
Location
Arizona
I like the idea and I think that's how it should have been from the factory, combine that with a stock heat shield, if it fits, and that's a long life alternator!

I'm stealing this. Thanks for posting it.
 

JNR

Well-known member
Joined
Apr 23, 2004
Messages
9,820
Location
ca
Well, I threw a coat of aluminum high heat paint on it and bolted it on for now so that I can proceed on the manifold/O2/turbo install. Came out pretty good and would show a pic, but doesn't look much different on the picture even though in person 10X better (with the paint); weird. Probably the time and distance I took pic, but you know what it looks like.

As for making other ones...I'd really like to help others out, but it would end up costing a lot of $$$ to do this right and not sure anybody is willing to spend $125-150 on a nice stainless steel unit, which is probably what it would end up being when all is said and done (that is water jet, break bent, etc. - a top notch piece). I cannot sell things like I made here being it's not as nice as I would like it to be and with my limited resources in my garage right now (too much crap, in process of organizing, etc.), I wouldn't be able to commit to making something like this right now. I'm sorry and really wished I could. I do have the resources to farm this out, but that adds cost and without commitment puts a big risk on my end ($), which I cannot afford right now. Down the road, maybe (not just this, I have other things too), but it's a tough position to be in where you can come up with something, but not have the time, money, resources and whatnot to share it with others.

So, partly why I post things like this to share with the community to encourage others to do the same thing, as it's not really that hard and the satisfaction of doing yourself is greater than any part you can buy, IMO. There are exceptions to this of course, but on something like this, it's one of those things that are quite simple to replicate on your own if you take your time. Just be forewarned, as toybreaker also pointed out, that working with silica should always be done when wet to avoid airborne partical damage mostly, but it also keeps it nicely together.
 
Support Vendors who Support the GVR-4 Community
Boosted Fabrication ECM Tuning ExtremePSI Fuel Injector Clinic Jacks Transmissions JNZ Tuning Kiggly Racing Morrison Fabrications RixRacing RockAuto RTM Racing STM Tuned

Recent Forum Posts

Recent Classifieds Listings

Top